Hobby Dutch Bucket Plant Production System
THE DUTCH BUCKET plant production system offers flexibility in size and layout. The system can be configured to fit a relatively small area in your hobby greenhouse, and will easily accommodate a few to several large fruiting plants that you can grow in the greenhouse for a few months up to a year. Because the size of the plants in the buckets will be large, you will want to place the buckets so that you can get next to each plant in the system to perform the needed cultural work and pick the fruit it produces.
SYSTEM COMPONENTS
The Dutch Buckets are the heart of the system. They contain the media in which the plants grow and they can be positioned to provide the plant spacing required for the crop being grown. Their design incorporates many features that allow them to be the central part of a very plant- and grower-friendly system.
Dutch Buckets sit on a drain line made out of 1-1/2-in. PVC pipe. Holes are drilled in the drain line to accommodate the drainage nipple of the Dutch Bucket. Excess nutrient solution is conducted away from the plants via the drain line, preventing it from flowing onto the floor of the greenhouse, where it could encourage the growth of algae and provide a slipping hazard for the grower or greenhouse visitors. Any drainage is conducted out of the greenhouse for disposal. It can be applied to trees, bushes, or other landscape plants growing in the soil outside the greenhouse.
The area below the drain in each bucket serves as a reservoir of fertilizer to provide nutrients to the plants between feedings. As the solution in the bucket is absorbed by the plants, the perlite in the buckets wicks it up from the reservoir to ensure a steady supply of nutrients to the plants. When the nutrient solution is run through the system, the reservoir in each bucket is refilled and overrun just enough to ensure that only fresh solution is present in the reservoir.
Small Dutch Bucket production systems are fed using a central fertilizer reservoir. A reservoir system is much more economical than the injector systems often used to feed larger commercial Dutch Bucket systems. The frequency of mixing and diluting fertilizer in a reservoir system depends on the size of the reservoir and the number of buckets and plants in the system. In a smaller hobby-sized system, frequency will range from a few days to every day to ensure that the plants will be fed as needed. When determining the size of a reservoir for a Dutch Bucket system, provide for one to two gallons of reservoir capacity per bucket per day. If you prefer not to mix fertilizer every day, make the reservoir large enough to mix two or three days’ worth of fertilizer solution at one time. When dry fertilizers are purchased for the system, they can be diluted into a concentrate solution, which is then diluted to the final feed solution in the reservoir as needed. Having the concentrate solution pre-made and at hand will minimize the time required for fertilizer mixing in the reservoir. It involves only a little extra time being invested every week or month to make up the liquid fertilizer concentrates.
Fertilizer solution is delivered to the Dutch Buckets through a distribution system made up of a pump, a feed line, emitters, emitter lines, and stabilizer stakes. A timer is also used to activate the delivery system on a desirable schedule.
In a small system, a small submersible pump is usually adequate for delivering the nutrient solution to the buckets. The larger the system, the more powerful the submersible pump must be. The pump should be capable of being used in the fairly corrosive fertilizer solution without damage; pumps having plastic components or labelled corrosive-resistant should be adequate.
To distribute the solution to the buckets, emitters that fit onto the feed line along its length are preferable to those that attach on the end of the delivery line. With this setup, any fertilizer buildup caused by evaporation of the water will be on the feed line rather than on or in the emitter. With this arrangement, systems will be less likely to have episodes of nutrient solution flow being blocked by crystallized fertilizer deposits in the emitters.
Emitters that shut off when the pressure in the feed line drops should not be used in a system using a small submersible pump to deliver fertilizer solution to the buckets. In systems of 20 or fewer buckets, fertilizer solution is uniformly distributed throughout the system when non-pressure–compensated emitters are used.
Stabilizer stakes are used on the bucket end of the delivery lines to designate where the fertilizer solution will be delivered and to prevent the solution from being shot outside the bucket. One end of the stake fits onto the end of the delivery line and the other end is pushed down into the perlite. The junction between the stake and the delivery line should be at least one inch above the surface of the perlite to prevent roots from finding their way up into the delivery line and causing a blockage.
The stabilizer stakes are placed right next to plants when they are first transplanted into the perlite-filled Dutch Bucket. This positioning ensures that the young plants receive adequate fertilizer solution. After a couple of weeks, the stabilizer stakes should be moved 2–3 in. away from the plants, which encourages more extensive and superior plant root development.
A timer used to turn the fertilizer solution pump on and off is placed in the electrical power supply going to the pump. Some of the newer digital timers have the features needed: the timer should have the capacity of twice the amperage required for the continuous operation of the pump, and, because the plants in the Dutch Bucket system need to be irrigated frequently through the daylight hours, a timer with an adequate number of on/off settings. When you plan to use your system during the summer months, a timer with at least 14 on and off settings will be required. This allows for one or more feedings an hour beginning two to three hours after sunrise and ending an hour and a half to two hours before sunset. Many commercial growers will irrigate their plants twice an hour during the day.
PLANTS FOR THE DUTCH BUCKET SYSTEM
Tomato, cucumber, eggplant, squash, pepper, and pole bean plants are all commonly grown in the Dutch Bucket system. When growing tomato, eggplant, and pepper plants, plan the spacing of your buckets to allow for at least 4 sq ft per plant. Each bucket will contain two plants. Cucumber and squash plants should be provided 6–8 sq ft per plant. Again, each Dutch Bucket will support two plants, so the buckets need to be spaced accordingly. The above space requirements for the plants include an allowance for walkways in the area around the plants. Pole beans can be grown on a number of different spacings. The suggestion here is that you use the bucket spacing for tomatoes and four bean plants, plus or minus, in each bucket.
Tomatoes
Greenhouse tomato plants are indeterminate (staking type) plants in contrast to the determinate (bush) tomato plants. Indeterminate plants are used because they produce continuously over a long period of time once they come into production. Tomatoes in the greenhouse require a process of lowering as the plant grows in order to allow the plant to continue its growth over a period of time within the same space. Although the plants are lowered, the plant tops are kept in a vertical position. Lowering involves laying the old part of the stem down on top of the buckets as the top of the plant is leaned away form the bucket containing its roots. All suckers or branches will need to be removed as the plant grows so that its aerial parts consist of only the main stem, leaves, and flower and fruit clusters. Tomato plant flowers must be pollinated before fruit will set and develop.
Tomato flowers are self-pollinating and are not insect-pollinated because they have no nectar glands to attract the insects. In the greenhouse, because of reduced air movement, commercial growers use a vibrating device or bumblebees to assure that the pollen is released from the flower stamens. Since the bumblebee hives equipped with an artificial nectar supply require more pollen-producing flowers than the hobby-sized house would contain, they are not an option for tomato plants in a small greenhouse. An electric toothbrush can be used to pollinate the flowers when the hobby grower has only a few tomato plants. Cut the bristles off the toothbrush and touch the edge of the brush to the plant near (but not on) the flowers. Do not touch the flowers themselves with the vibrating brush. That could damage and scar the tomato that develops from the flower.
Cucumbers
Greenhouse cucumbers are typically all female plants that produce seedless fruit. No pollination is necessary, nor is it desirable. The plants are trained vertically and all suckers are removed until the plants reach the support system in the greenhouse. Once the plant has reached this point, the plant stem is taken along the horizontal support member for a short distance so that a couple of suckers or laterals can be allowed to grow and hang down. The growing point of the main stem is then removed so that the laterals will grow more vigorously. Once cucumbers have been picked off it, the first sucker on each of the laterals is allowed to grow down to the floor to replace the lateral.
Cucumber fruit on these female plants develop without seeds being set in them. The flowers should be removed from the first nine nodes so that the young plant will develop properly. Fruit are ready to harvest four to five days after the flowers close on them. They will first elongate and then start to enlarge in diameter. They should be picked after they slow down on the elongating and have started to fill out in diameter. They should be picked while there are still some ridges left in the skin of the cucumber fruit.
The long European cucumber fruit should be wrapped in plastic to keep it from losing water and becoming rubbery. The newer, shorter seedless cucumber does not need to be wrapped in plastic. Placing it into a plastic bag, however, will keep it crisp a little longer. For best flavour, cucumber fruit should not be stored below 55°F. This means they should not go into the refrigerator. Cucumber plants can be kept in production for three to four months. It takes four to six weeks to get the plants from seed to first pick. Commercial greenhouses typically produce two to three crops a year. You can start a few new plants every couple of months and have a more continuous supply of fruit over the year.
Bell Peppers
Bell peppers are slow-growing plants that are cultivated on the same greenhouse spacing as tomatoes. When the young plant splits and produces two, three, or even four growing points, it is pruned back to two growing points and the flower at the junction is removed from the plant. As each stem grows it will split into two stems at each node. One of the stems should be terminated just beyond the point where the first leaf appears. The flower bud at the leaf where the stem was terminated is kept on the plant at least until it is determined that the fruit on the stem that was left intact has set and is going to grow. Because the stems are quite woody and not very flexible, they are usually not lowered like tomato plants. The rate of growth of pepper plants is so slow that it will take almost a year for the two stems to reach the greenhouse support system in most greenhouses.
Like tomatoes, Bell peppers have a complete, naturally self-pollinated flower. The flowers, however, are much easier to pollinate than are tomato flowers. A gentle but firm shake of the top of the plant where the flowers are will release any pollen that is mature and ready to be released. This should be done every other day to plants that have an open blossom.
The main colours for bell peppers are red, yellow, and orange. Green bell peppers are simply peppers that are not yet ripe. There are now varieties of peppers that have been specifically bred and selected for greenhouse production. Unlike tomatoes, bell peppers do not continue ripening after they have been picked. If you want ripe peppers, they must be left to ripen on the plant.
Eggplant
Eggplant is similar to bell peppers in the way it is grown in the greenhouse. The plant spacing is a minimum of 4 sq ft per plant, just like bell peppers and tomatoes. Although two tops are allowed to grow on the plant, this is accomplished differently because the plant grows a little differently. As the eggplant grows, small suckers develop at each node. They are removed. At the seventh or eighth node up, a much more vigorous sucker develops. That sucker is kept on the plant as the second top. It is supported on a separate support twine of its own. The first flower on the plant will be produced at the site of that vigorous sucker. The flower is allowed to develop into a fruit.
Eggplant flowers are, like pepper flowers, easy to pollinate by shaking the plant. The dried-up petals and stamens should be picked off the end of the developing fruit. If they remain, they can get infected with a fungus.
The eggplant stem is woody and not subject to leaning and lowering. The plant will grow and produce for a total of about six months. By that time, the top of the plant will be approaching the support system in the greenhouse.
Pole Beans
Pole beans do well in the Dutch Bucket system and are a source of just-picked fresh beans on an ongoing basis. The beans in the grocery store may be called fresh beans but they are several days from harvest. Freshly picked beans that are not quite mature enough for shipping are a treat to those who enjoy fresh beans.
To grow pole beans in the greenhouse, let the plants grow up the support twine. Allow any branches that develop to remain. Pick the beans as they are ready. Leaving the beans on the plant longer than necessary will cause the plants to shut down and stop producing flowers and beans sooner than they otherwise would have. Pole beans grow rapidly in the greenhouse, so you will probably use two to three plantings a year, with more plantings if you overlap the crops, so that you have continuous production throughout most of the year.
Squash
Climbing yellow straight neck squash and climbing zucchini squash can be grown in the greenhouse. However, the plants commonly available are a bush plant and do not produce over as long a time as the more newly available climbing plants. The seeds for these climbing varieties may not be easily found. When growing both climbing squash plants, pollen will need to be transported from the male flower to the female flower using a small paintbrush. Seeds must be set in these squash for them to grow and mature. The pollen is produced in separate male flowers on the same plant. The male flowers can be identified because they will not have a little squash behind the blossom like the female flower has. For best quality and flavour, pick the fruit before the skin starts to harden and get tough. If picking for sale at market, let the fruit grow until the skin toughens, to protect the fruit from damage when handled. The climbing squash plants will last from four to six months in the greenhouse, so you can plan for a two or more plantings a year to have ongoing harvests.
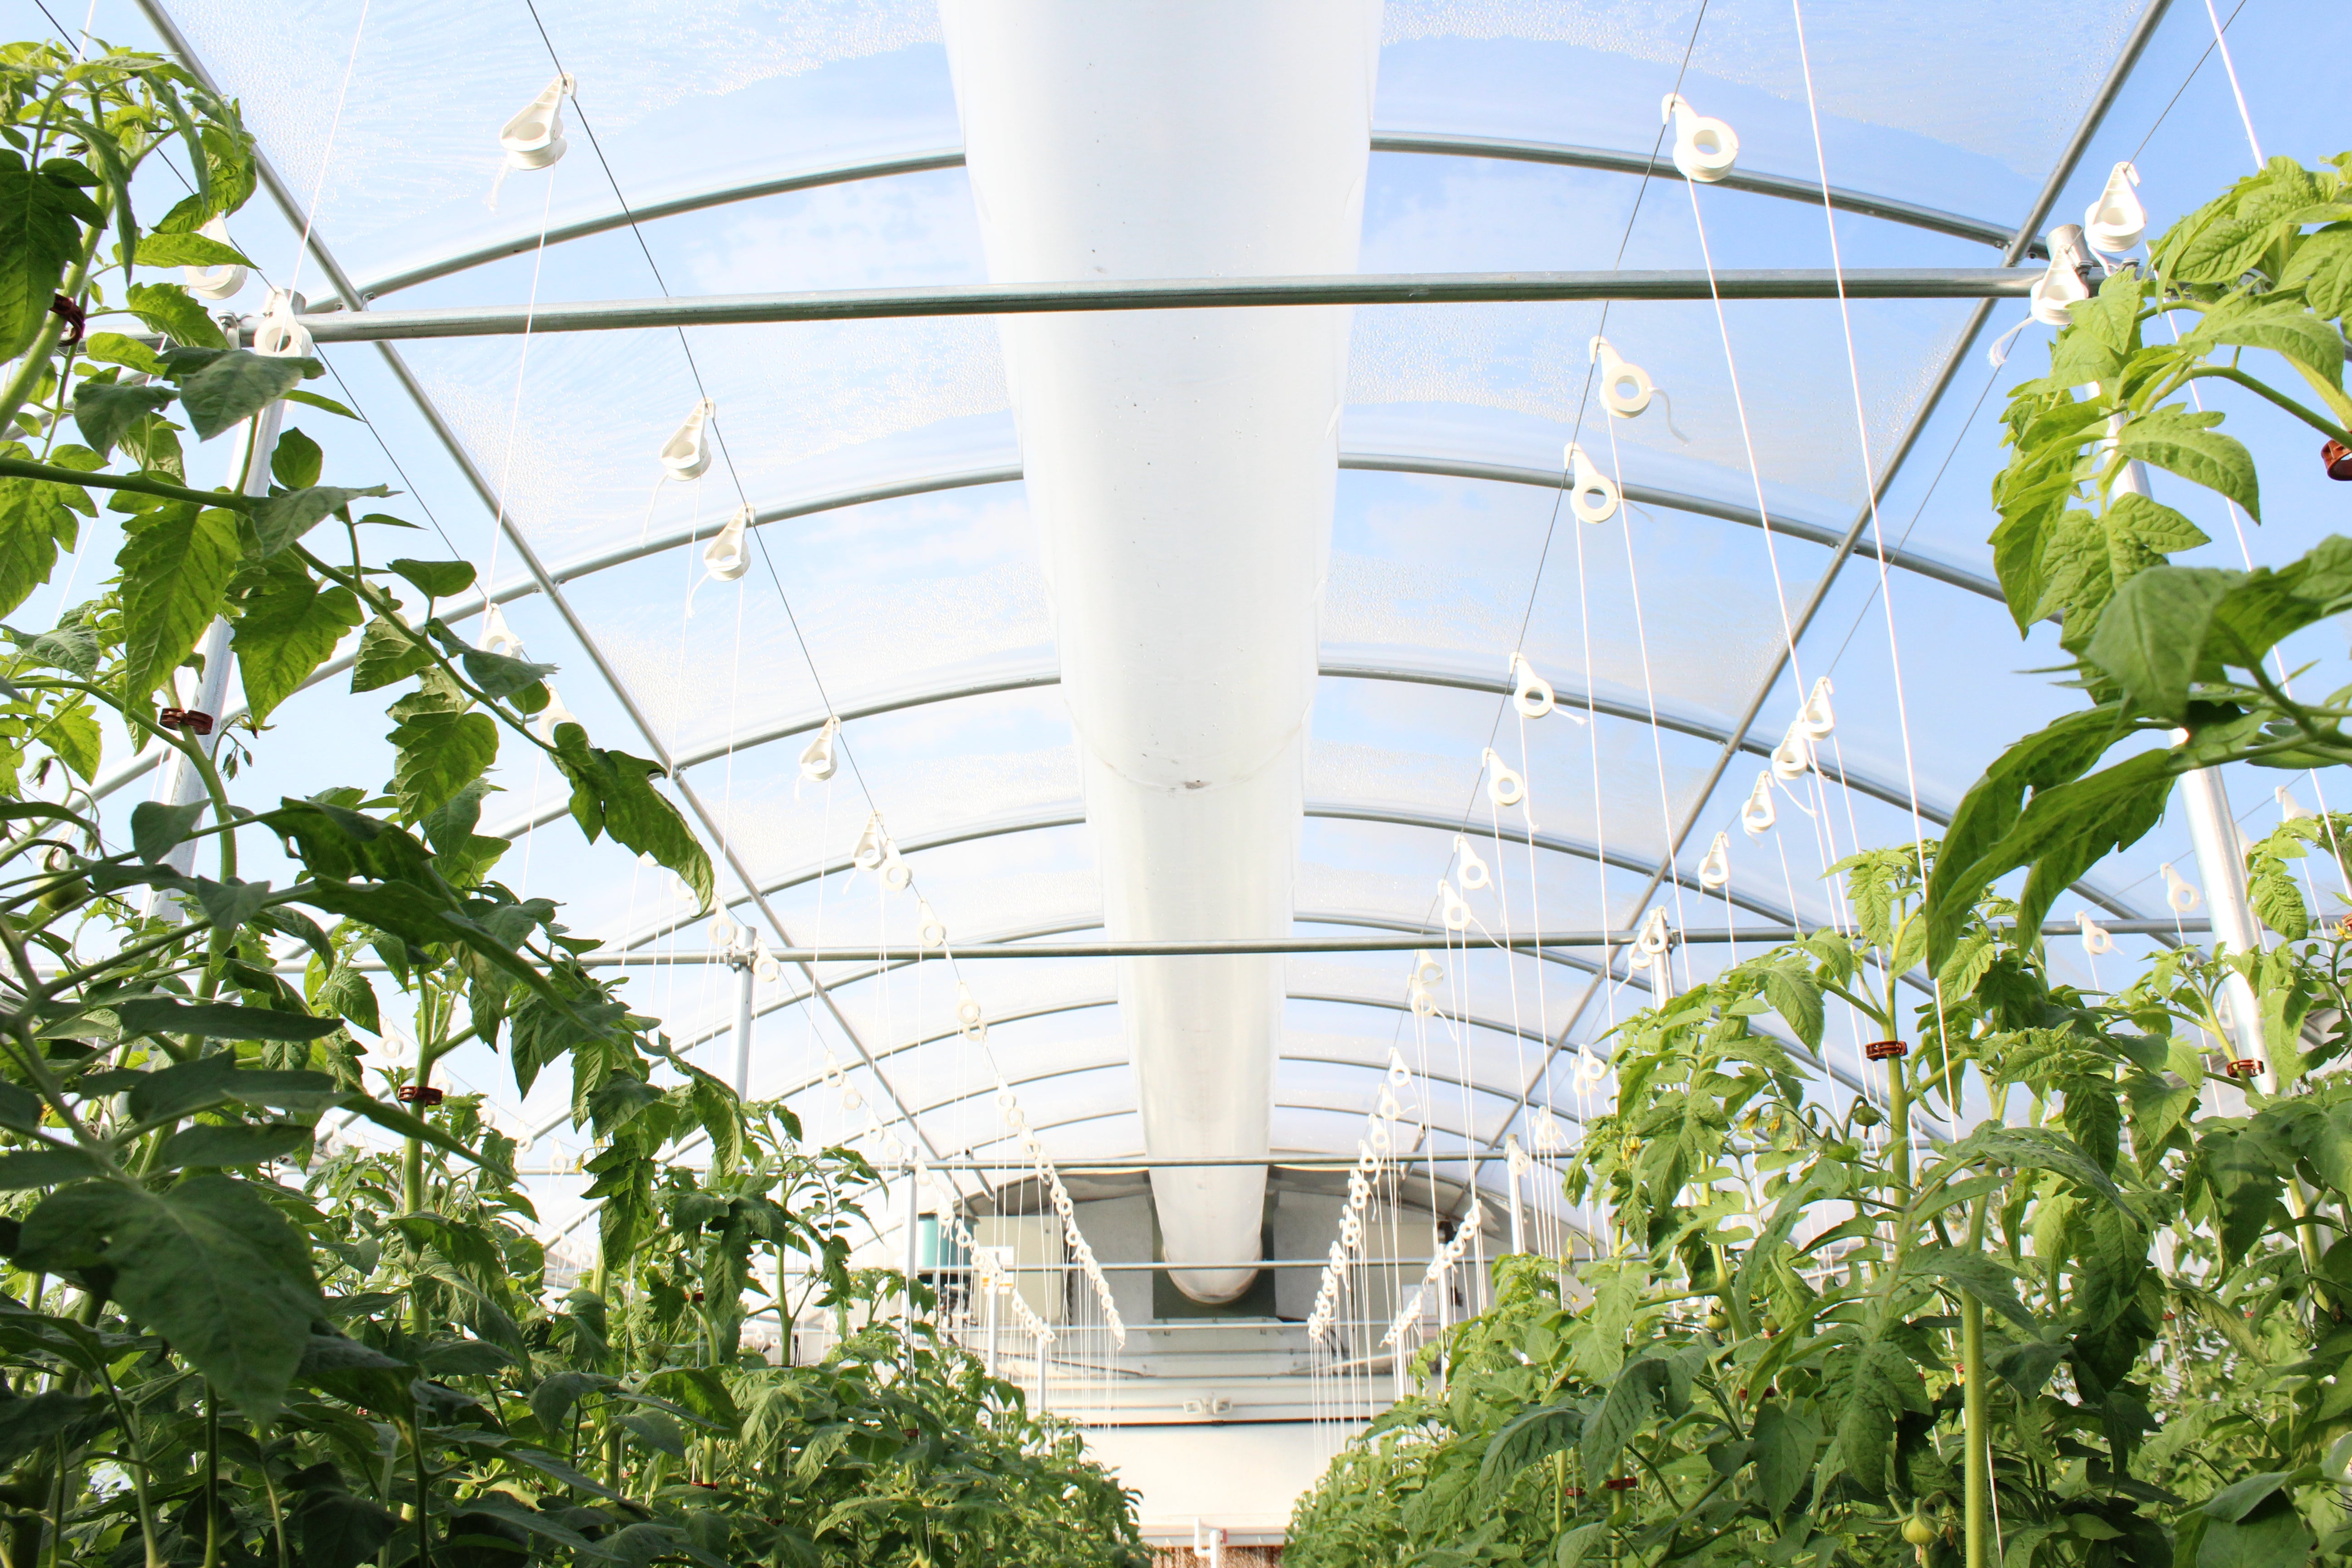
PLANT SUPPORT SYSTEM
All the plants discussed in this article must be tied up and supported for proper growth. The vine twine used to support the plants must, in turn, be supported overhead. Clothesline wire can be strung over the plants from one vertical support pole to the next throughout the length of the greenhouse. Wrapping the clothesline around each structural member along the way evenly distributes the weight load of the supported plants and prevents the weight being handled only by the support members at the ends of the greenhouse.
In summary, the Dutch Bucket growing system is one of the most versatile and simple systems to use in the greenhouse. These systems allow for great flexibility in layout and in the variety of plants that can be grown in them.
bato bucket dutch bucket